Sign In
Upload
Manuals
Brands
Nokia Manuals
Cell Phone
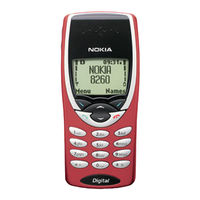
8260 - Cell Phone - AMPS
User Manuals: Nokia 8260 - Cell Phone - AMPS Cellular
Manuals and User Guides for Nokia 8260 - Cell Phone - AMPS Cellular. We have
3
Nokia 8260 - Cell Phone - AMPS Cellular manuals available for free PDF download: User Manual
Nokia 8260 - Cell Phone - AMPS User Manual (153 pages)
Nokia Cell Phone User Guide
Brand:
Nokia
| Category:
Cell Phone
| Size: 1.46 MB
Table of Contents
Export Controls
3
Legal Information
3
Table of Contents
4
1 For Your Safety
14
Use Sensibly
15
Qualified Service
15
Accessories and Batteries
15
2 Welcome
16
Before You Begin
16
Understand Network Services
16
Visit Nokia on the Web
16
Contacting Nokia
17
When You Need to Contact Your Service Provider
17
3 Prepare Your Phone for Use
18
Install the Battery
18
First, Remove the Back Cover
18
Next, Insert the Battery
18
Last, Replace the Back Cover
18
Charge the Battery
18
When the Charger Is Not in Use
19
When You Need to Remove the Battery
19
4 Get to Know Your Phone
20
Keys and Screen
20
Keys
21
Power Key
22
Start Screen
22
Navigation Keys
22
Selection Keys
22
Scroll Key
23
Scroll Bar
23
Indicators and Icons
23
5 Make and Answer Calls
26
Make a Call
26
Answer a Call
26
Adjust the Earpiece Volume
27
Redial the Last-Dialed Number
27
Use Caller ID
27
Get a Strong Signal
27
Keep Calls Private
28
6 Use Phone Menus
29
Navigate Menus
29
Scroll through Menus
29
Use a Shortcut
29
Exit Menu Levels
30
Get Help
30
List of Shortcuts
30
7 Enter Letters and Numbers
34
Enter Letters
34
Edit Names
35
Change from Capital (Uppercase) Letters
35
Use Punctuation and Special Characters
35
Enter Numbers
36
List of Special Characters
36
8 Use the Phone Book
37
About the Phone Book
37
Use Phone Book Menus
37
Change Views
38
Add Names and Numbers
39
Change a Stored Telephone Number
39
Recall and Redial Numbers
40
Erase Stored Names and Numbers
41
Erase the Entire Phone Book
41
Check Memory Status
42
9 Use Voice Mail
43
When You Have a Message
43
Set up Your Voice Mailbox
43
Set Greetings and Passwords
44
Listen to Your Voice Messages
44
10 Work with the Call Log
45
Check the Call Log
45
Check Missed Calls
46
Check Previously Dialed Calls
46
Check Received Calls
47
Clear Call Lists
47
Check Call Timers
48
Turn on a Current Call Timer
49
Clear Call Timers
49
11 Use Advanced Calling Features
50
Set In-Call Options
50
Use Call Waiting
51
Store the Call Waiting Feature Code
51
Manage Calls
51
Make a Conference Call
52
Recall a Number from the Phone Book During a Conference Call
52
Use Call Forwarding
53
Store the Call Forwarding Feature Code
53
Activate Call Forwarding
53
Redial Automatically
54
Use a Calling Card
55
Save Calling Card Information (Step 1)
55
Save Calling Card Information (Step 2)
56
Choose a Calling Card to Use
57
Make a Calling Card Call
57
Send Your Own Number in Caller ID
57
Store the Send Own Number Feature Code
58
Set Whether or Not Your Number will Appear
58
Select a Phone Number
58
Select the Phone Number
59
Select Digital or Analog
59
Set Touch Tones
60
Set Manual Touch Tones
60
Set Touch Tone Length
60
Store Touch Tone Sequences (Strings)
61
12 Customize Your Phone
62
What Is a Profile
62
Select a Different Profile
62
Customize a Profile
63
Set Ringing Options
63
Set the Ringing Volume
64
Set the Ringing Tone
65
Set a Vibrating Alert
65
Set Keypad Tones
66
Set Warning and Game Tones
66
Set the Message Alert Tone
67
Set Your Phone to Answer Automatically
67
Set the Lights (Car Kit Only)
68
Rename Profiles
68
Restore Factory Settings
69
Set the Display Language
69
Set and Display the Clock
69
Set the Clock
69
Display or Hide the Clock
70
Select the Time Format
70
Set Automatic Update of Date and Time
71
Turn on Automatic Update of Date and Time
71
Confirm First
71
Turn off Automatic Update of Date and Time
71
Add a Welcome Note
72
Use 1-Touch Dialing
72
Assign a Name or Number to a 1-Touch
73
Dial Key
73
Change 1-Touch Dialing Numbers
73
Erase 1-Touch Dialing Numbers
73
Use Emergency Key 9
74
Activate the Emergency Key 9
74
Make an Emergency Call
74
Use Caller Groups
75
Add Names to a Caller Group
75
Assign a Ringing Tone to a Caller Group
75
Rename a Caller Group
76
Remove Names from a Caller Group
76
Display Caller Group Graphics
76
Receive a Downloaded Graphic
76
View the New Graphic
77
Save a Received Graphic
77
Discard a Received Graphic
77
13 Security
78
Change Your Security Code
78
Protect Your Phone with the Lock Code
79
Turn on the Phone Lock
79
Store an Unlocked Phone Number
80
Call the Unlocked Phone Number
80
Answer a Call with Phone Lock on
80
Change Your Lock Code
80
Turn off Phone Lock
81
Lock the Keypad
81
Activate Keyguard
81
Deactivate Keyguard
82
Answer a Call While Keyguard Is Active
82
Restrict Calls
82
Restrict Outgoing Calls
83
Restrict Incoming Calls
83
Set up the Way Your Phone Selects a Network
85
Select a Public System
86
Roaming Indicators
87
About Writing Messages
88
Write with Predictive Text Input
89
Turn on Predictive Text Input
89
Turn off Predictive Text Input
91
Insert Numbers
92
Insert Symbols
92
Write Compound Words
92
Write and Send a Text Message
92
Save a Message in the Saved Folder
93
Resend a Message from the Outbox
93
Receive a Text Message
94
Read a Text Message
94
Erase a Message
96
Reply to a Message
96
Forward a Message
96
Send and Receive
97
Edit an E-Mail Address
98
Send an E-Mail Message
98
Receive an E-Mail Message
100
Read an E-Mail Message
100
17 Use Your Personal Assistant
103
Use the Calendar
103
View the Calendar
103
Move from Day to Day
104
Create a Calendar Note
104
View the Day's Notes
107
Erase Notes
108
When a Calendar Alarm Goes off
108
Send a Calendar Note
109
Receive a Calendar Note
109
Send or Receive Calendar Notes
109
Send and Receive Business Cards
110
Send a Business Card
110
View a Received Business Card
110
Save a Viewed Business Card
110
Delete a Viewed Business Card
111
Download Ringing Tones
111
Notification of Received Ringing Tone
111
Listen to Received Ringing Tones
111
Save Received Ringing Tones
111
Discard Received Ringing Tones
112
Alarm Clock
112
Set the Alarm Clock
112
Turn off the Alarm Clock When It Rings
113
Turn off the Alarm Clock Altogether
113
Use the Calculator
113
Convert Currency
114
Reference Information
119
Batteries, Chargers, and Accessories
119
Important Safety Information
120
Traffic Safety
120
Operating Environment
121
Hearing Aids
122
Other Medical Devices
122
Posted Facilities
122
Potentially Explosive Atmospheres
123
Emergency Calls
124
Radio Frequency (Rf) Signals
125
Care and Maintenance
127
A few Practical Rules for Accessory Operation
128
Charging Times
129
Standby and Talk Times
129
Chargers and Other Accessories
130
Troubleshooting
132
Frequently Asked
133
Technical Information
141
Limited Warranty
142
Advertisement
Nokia 8260 - Cell Phone - AMPS User Manual (152 pages)
Brand:
Nokia
| Category:
Telephone
| Size: 0.95 MB
Table of Contents
User Guide
1
Copyright Information
2
Table of Contents
3
1 For Your Safety
13
Qualified Service
14
Accessories and Batteries
14
2 Welcome
15
Before You Begin
15
Contacting Nokia
16
When You Need to Contact Your Service Provider
16
3 Prepare Your Phone for Use
17
Install the Battery
17
First, Remove the Back Cover
17
Next, Insert the Battery
17
Last, Replace the Back Cover
17
Charge the Battery
18
When You Need to Remove the Battery
18
4 Get to Know Your Phone
19
Keys and Screen
19
Power Key
21
Start Screen
21
Navigation Keys
22
Indicators and Icons
23
5 Make and Answer Calls
26
Make a Call
26
Answer a Call
26
Adjust the Earpiece Volume
27
Redial the Last-Dialed Number
27
Use Caller ID
27
Keep Calls Private
28
6 Use Phone Menus
29
Navigate Menus
29
Scroll through Menus
29
Use a Shortcut
29
Change Menu Levels
30
Get Help
30
List of Shortcuts
30
7 Enter Letters and Numbers
34
Enter Letters
34
Edit Names
35
Change from Capital (Uppercase) Letters
35
Use Punctuation and Special Characters
35
Enter Numbers
36
Use Special Characters in Numbers
36
List of Special Characters
36
8 Use the Phone Book
37
About the Phone Book
37
Use Phone Book Menus
37
Change Views
38
Add Names and Numbers
39
Change a Stored Telephone Number
39
Recall and Redial Numbers
40
Erase Stored Names and Numbers
41
Erase the Entire Phone Book
42
Check Memory Status
42
9 Use Voice Mail
43
When You Have a Message
43
Set up Your Voice Mailbox
43
Set Greetings and Passwords
44
Listen to Your Voice Messages
44
10 Work with the Call Log
45
Check the Call Log
45
Check Missed Calls
46
Check Previously Dialed Calls
47
Check Received Calls
47
Clear Call Lists
47
Check Call Timers
48
Turn on a Current Call Timer
49
Clear Call Timers
49
11 Use Advanced Calling Features
50
Set In-Call Options
50
Use Call Waiting
51
Store the Call Waiting Feature Code
51
Manage Calls
52
Make a Conference Call
52
Use Call Forwarding
53
Store the Call Forwarding Feature Code
53
Activate Call Forwarding
54
Redial Automatically
55
Use a Calling Card
55
Save Calling Card Information (Step 1)
55
Save Calling Card Information (Step 2)
56
Choose a Calling Card to Use
57
Make a Calling Card Call
58
Send Your Own Number in Caller ID
58
Store the Send Own Number Feature Code
58
Select a Phone System (NAM)
59
Select the NAM for Your Phone
60
Select Digital or Analog
60
Set Touch Tones
61
Set Manual Touch Tones
61
Set Touch Tone Length
61
Store Touch Tone Sequences (Strings)
62
12 Customize Your Phone
63
What Are Profiles
63
Select a Different Profile
63
Customize a Profile
64
Set Ringing Options
65
Set the Ringing Volume
66
Set the Ringing Tone
66
Set a Vibrating Alert
67
Set Keypad Tones
67
Set Warning and Game Tones
68
Set the Message Alert Tone
68
Set Your Phone to Answer Automatically
69
Set the Lights (Car Kit Only)
69
Rename Profiles
70
Restore Factory Settings
70
Set the Display Language
71
Set and Display the Clock
71
Set the Clock
71
Display the Clock
72
Select the Time Format
72
Add a Welcome Note
72
Use 1-Touch Dialing
73
Assign a Name or Number to a 1-Touch
73
Dial Key
73
Change 1-Touch Dialing Numbers
74
Erase 1-Touch Dialing Numbers
74
Use Emergency Key 9
74
Activate the Emergency Key 9
75
Make an Emergency Call
75
Use Caller Groups
75
Add Names to a Caller Group
75
Assign a Ringing Tone to a Caller Group
76
Rename a Caller Group
76
Remove Names from a Caller Group
77
Display Caller Group Graphics
77
13 Security
78
Change Your Security Code
78
Protect Your Phone with the Lock Code
79
Turn on the Phone Lock
79
Store an Unlocked Phone Number
80
Call an Unlocked Phone Number
80
Answer a Call While Using a Lock Code
80
Change Your Lock Code
80
Turn off the Lock Code
81
Lock the Keypad
82
Activate Keyguard
82
Deactivate Keyguard
82
Answer a Call While Keyguard Is Active
83
Restrict Calls
83
Restrict Outgoing Calls
83
Restrict Incoming Calls
84
14 Set Network Services Features
85
Set up How Your Phone Selects a System
86
Select a Public System
87
Switch from Private to Public System
88
Roaming
88
15 Send and Receive Text Messages
89
Write a Message
89
About Standard Text Input
89
About Predictive Text Input
90
Turn on Predictive Text Input
90
Keys and Tools for Predictive Text Input
91
Turn off Predictive Text Input
91
Notes about Predictive Text Input
92
Send a Text Message
93
Save a Message in the Outbox
94
Resend a Message from the Outbox
94
Receive a Text Message
95
Read a Text Message
95
Choose Options for a Message
96
When Your Phone's Memory Is Full
96
Erase a Message
97
Reply to a Message
97
Forward a Message
97
Retrieve a Number
97
16 Use Your Personal Assistant
99
Use the Calendar
99
View the Calendar
99
Move from Day to Day
100
Create a Calendar Note
100
View the Day's Notes
104
Erase Notes
105
When a Calendar Alarm Goes off
105
Send or Receive Calendar Notes
106
Send and Receive Business Cards
107
Send a Business Card
107
View a Received Business Card
107
Save a Viewed Business Card
107
Delete a Viewed Business Card
108
Download Ringing Tones
109
Notification of Received Ringing Tone
109
Listen to Received Ringing Tones
109
Save Received Ringing Tones
109
Alarm Clock
110
Set the Alarm Clock
110
Turn off the Alarm Clock When It Rings
110
Turn off the Alarm Clock Altogether
110
Calculator
111
Use the Calculator
111
Convert Currency
112
17 Games
114
Memory
114
Snake
114
Logic
114
Rotation
116
18 Reference Information
117
Batteries, Chargers, and Accessories
117
Important Safety Information
119
Traffic Safety
119
Operating Environment
119
Electronic Devices
120
Potentially Explosive Atmospheres
121
Vehicles
121
Emergency Calls
123
Make an Emergency Call
123
Radio Frequency (RF) Signals
123
Care and Maintenance
125
Accessories
126
Battery
127
Chargers and Other Accessories
128
Troubleshooting
130
19 Frequently Asked Questions (FAQ)
132
20 Glossary of Terms.
141
21 Technical Information
141
Limited Warranty
143
Index
147
Nokia 8260 - Cell Phone - AMPS User Manual (98 pages)
Software and PC/PDA Connectivity Guide
Brand:
Nokia
| Category:
Cell Phone
| Size: 1.84 MB
Table of Contents
Table of Contents
3
1 Introduction
7
Observe System Requirements
7
Learn about Compatible Applications
8
Understand Requirements for Digital Data and Fax Calls
8
Print this Guide
9
Observe Abbreviations
9
Observe Safety Notes
9
Learn about Infrared Communications
10
2 Nokia PC Suite Installation
11
Learn about IR for Me and XP Users
11
Install PC Suite
12
Remove PC Suite
14
3 Nokia Content Copier
15
Learn about Compatible Phones
15
Learn about Content Copier
16
Nokia Connection Manager
19
Learn about Other Nokia Phones
20
4 Nokia PC Composer
22
Tour PC Composer
23
Compose a New Ringing Tone
24
Edit a Ringing Tone
25
Learn about Other PC Composer Views
26
Save Your New Ringing Tone
27
Transfer Ringing Tone to Your Phone
27
Create Ringing Tones from MIDI Files
28
Edit and Save
29
Work with RTTTL Ringing Tone Files
30
5 Nokia PC Sync
31
Configure PC Sync
31
Set General Synchronization Properties
32
Set Calendar and Contacts Properties
32
Set Pim Properties
33
Synchronizing for the First Time
34
Understand the Basics of Synchronization
35
Start Synchronization
36
Use the New Synchronization Command
36
Create a Custom Contact List
37
Other Pim Applications
39
6 Nokia Phone Editor
41
Learn about Phone Memory and PC Storage Locations
41
Choose the Right Application for Managing Contacts
42
Tour Nokia Phone Editor and Contacts Window
43
Manage Contacts Using Phone Editor
44
Add a Contact to a Caller Group
45
Edit Profiles and Caller Groups
46
Edit Settings
48
Launch Other PC Suite Applications
48
7 Wireless Modem Setup
49
Learn about Digital Data
49
Understand Modem Software
52
Connect for the First Time Using DLR-3P or DKU-6
53
Connect for the First Time Using IR (Windows 98, Me)
55
Establish an Infrared Connection
56
Create Additional Modem Installations
57
Learn about IR and Windows 2000
58
Windows 2000 Modem Setup Instructions
59
Connect for the First Time: IR (Windows XP Home and Professional)
61
Learn about IR and Windows NT Workstation 4.0
61
8 Data and Fax Software Configuration
62
Observe the Following First
62
Configure Your Data Software
62
Use Microsoft Dial-Up Networking for Packet Data (2G, 3G) and QNC
63
Configure America Online to Connect Via Packet Data or QNC
64
Use Microsoft Dial-Up Networking-CSD
65
Create a New Connection
66
Get Connected to America Online (AOL)
67
Learn about Other Data Applications
69
Configure Your Fax Software
71
Learn about Manual Selection of Incoming Calls
72
Menu Options
74
Phone Display
74
9 Palmos Configuration
75
Learn about Packet Data, QNC, and Circuit Switched Data
75
Learn about Your Phone as a Wireless Modem
75
Understand Your Connection Options
76
Edit Connections Preferences
78
Make a Dial-Up Connection
79
10 Pocketpc Configuration
81
Learn about Packet Data, QNC, and Circuit Switched Data
81
Learn about Your Phone as a Wireless Modem
81
Understand Your Connection Options
82
Create a Modem Connection-Packet QNC
83
Data Modem Connection
85
Configure a Modem Connection-CSD
86
Before You Make a Digital Data Call
89
11 Macintosh Configuration
90
Learn about Special Hardware Needs
90
Configur the Macintosh os
91
Use Other Data/Fax Applications
94
Advertisement
Advertisement
Related Products
Nokia 8265 - Cell Phone - AMPS
Nokia 8265i
Nokia 8270
Nokia 8290 - Cell Phone - GSM
Nokia 8250
Nokia 8210
Nokia 8208
Nokia 822
Nokia 8210 4G
Nokia 8290
Nokia Categories
Cell Phone
Headsets
Transceiver
Telephone
Handhelds
More Nokia Manuals
Login
Sign In
OR
Sign in with Facebook
Sign in with Google
Upload manual
Upload from disk
Upload from URL